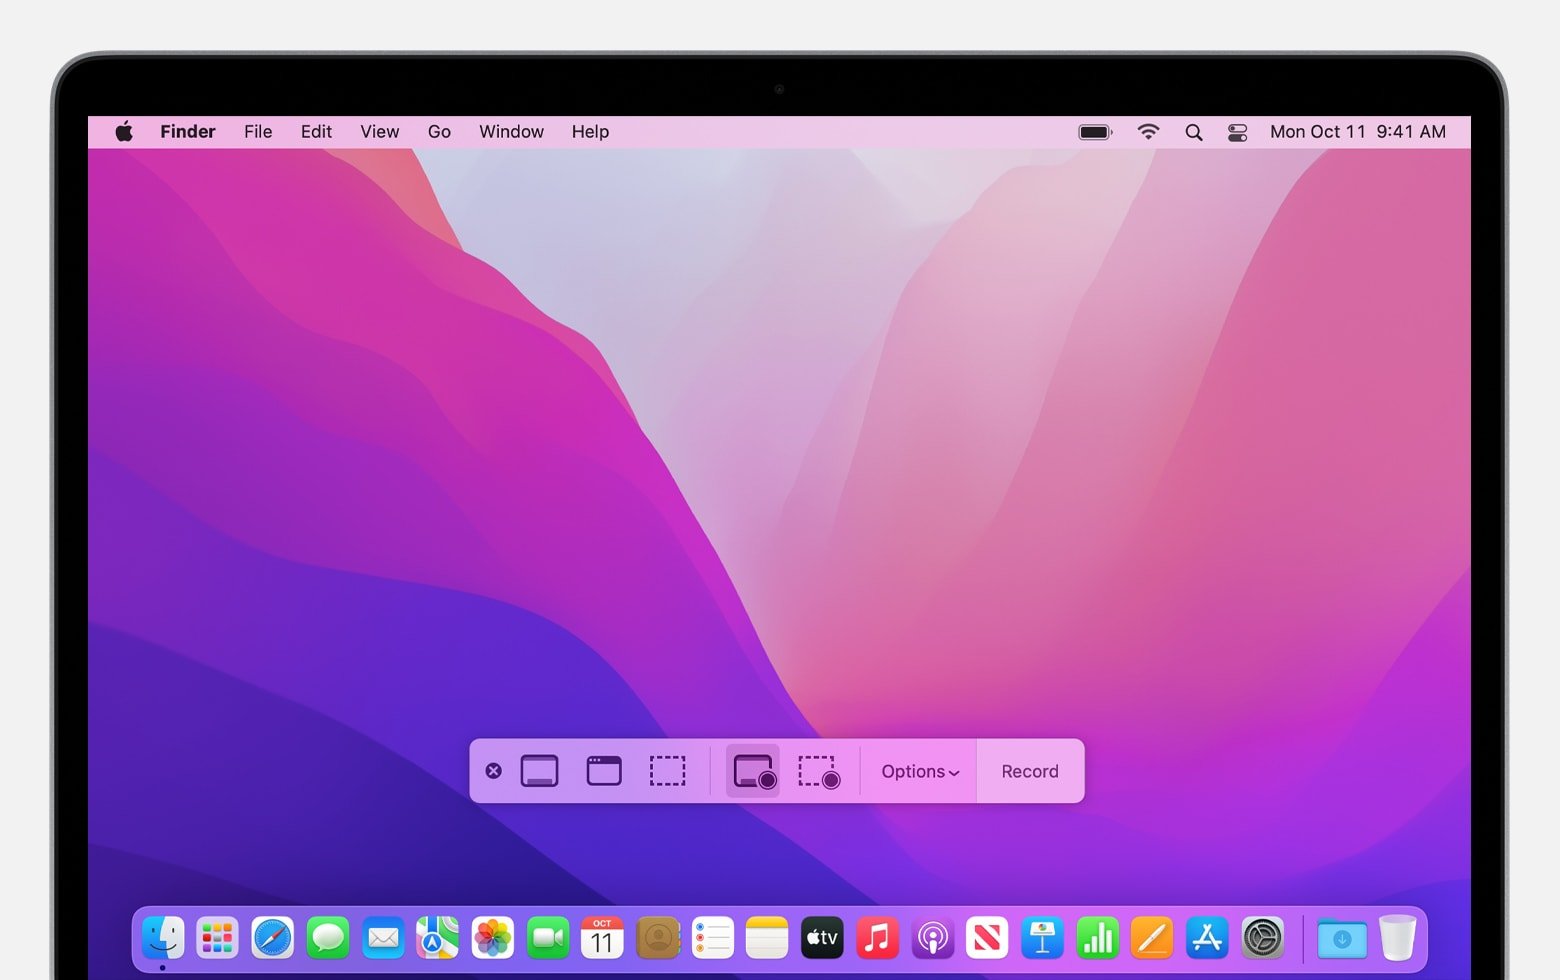
Yes, you can screen record on a MacBook. Use the built-in QuickTime Player or the Screenshot Toolbar for this task.
Screen recording on a MacBook is straightforward and user-friendly. The built-in QuickTime Player allows you to capture your screen with ease. Open QuickTime Player, select “New Screen Recording” from the File menu, and click the record button. Another method involves using the Screenshot Toolbar, available in macOS Mojave and later.
Press Shift + Command + 5 to open the toolbar, choose your recording options, and start recording. Both methods offer flexibility, letting you capture the entire screen or just a selected portion. Whether you need to create tutorials, save live streams, or record video calls, your MacBook has got you covered.
Credit: m.youtube.com
Screen Recording Basics
Screen recording on a MacBook can help you capture important moments. You might need it for tutorials, presentations, or sharing gameplay. This guide will cover the basics of screen recording on a MacBook.
Built-in Options
MacBooks come with built-in tools for screen recording. These tools are easy to use and accessible.
- QuickTime Player: Open QuickTime Player from your Applications folder. Click “File” and then “New Screen Recording”. A small control panel will appear.
- Screenshot Toolbar: Press
Shift + Command (⌘) + 5to open the Screenshot Toolbar. You can record the entire screen or a selected portion. - Control Center: For macOS Big Sur and later, open the Control Center from the menu bar. Click “Screen Mirroring” and select “Screen Recording”.
Third-party Apps
Sometimes, built-in tools might not meet all your needs. Third-party apps can offer more features.
| App | Features |
|---|---|
| Camtasia | Advanced editing, annotations, and effects. |
| OBS Studio | Free, open-source, with multiple output formats. |
| Snagit | Simple interface, quick sharing options. |
Choosing the right app depends on your needs. Basic tasks can be handled by built-in options. For advanced features, third-party apps are ideal.
Using Quicktime Player
QuickTime Player is a free tool on your MacBook. It helps in recording your screen. This tool is easy to use. You can start and save recordings quickly.
Starting A Recording
Follow these simple steps to start a screen recording:
- Open QuickTime Player from your Applications folder.
- Click on File in the menu bar.
- Select New Screen Recording.
- A small recording window will appear.
- Click the red Record button.
- Choose to record the entire screen or a selected portion.
- Click Start Recording to begin.
Saving Your Recording
After finishing the recording, you need to save it:
- Click the Stop button in the menu bar.
- A preview of your recording will appear.
- Click on File in the menu bar again.
- Choose Save.
- Select a location for the file.
- Give your file a name.
- Click Save to store your recording.
Now you have successfully saved your screen recording. QuickTime Player makes it easy to record and save your screen activities.
Advanced Recording Options
MacBooks offer versatile screen recording features. The advanced recording options give users more control. You can record specific areas or include audio in recordings. These options enhance the overall experience.
Recording Part Of The Screen
Recording the entire screen is not always necessary. MacBooks allow you to record only a part of the screen. This feature is useful for focused tutorials or presentations. To record a part of the screen:
- Open the built-in Screenshot tool by pressing
Command + Shift + 5. - Select the “Record Selected Portion” option.
- Drag to select the area you want to capture.
- Click the “Record” button to start recording.
This method keeps your recordings clean and to the point.
Including Audio
Adding audio to your screen recordings can make them more engaging. You can include system audio, microphone input, or both. To include audio in your recording:
- Open the Screenshot tool using
Command + Shift + 5. - Click on “Options” to open the drop-down menu.
- Select the desired audio source under “Microphone”.
- Choose between Internal Microphone or an external source.
- Start recording by clicking the “Record” button.
Including audio adds a professional touch to your recordings. Make sure to test your microphone settings beforehand.
Editing Your Screen Recordings
After you screen record on your MacBook, you may need to edit the recordings. Editing helps make the content more engaging and clear. Let’s explore a few ways to polish your screen recordings.
Trimming Clips
Trimming is the process of cutting unwanted parts from your video. It makes the content concise and to the point. Follow these steps:
- Open the screen recording in QuickTime Player.
- Click on Edit in the menu bar.
- Select Trim… from the dropdown menu.
- Drag the yellow handles to select the desired portion.
- Click Trim to finalize the edit.
Trimming ensures your viewers see only the most important parts of your recording.
Adding Annotations
Annotations help highlight key points in your recording. They can include text, shapes, or arrows. You can add annotations using iMovie or other editing software:
- Open your screen recording in iMovie.
- Select the Titles tab to add text annotations.
- Choose the Shapes tab to add arrows or other shapes.
- Drag and drop the annotation onto the timeline.
- Adjust the duration and position as needed.
Annotations make your content easier to understand and more engaging.
Common Issues And Fixes
Screen recording on a MacBook can be very useful. But, users often face issues. Here are some common problems and their fixes.
Audio Problems
Sometimes, recorded audio is missing or low. This can be annoying.
- Check the Microphone Settings: Ensure the right microphone is selected.
- Update macOS: An outdated macOS can cause audio issues. Always keep your macOS updated.
- Use Third-Party Apps: Consider using apps like Audacity for better audio control.
Video Quality
Users often complain about poor video quality. Here are some fixes:
- Adjust Screen Resolution: Lower resolution can improve performance and quality.
- Close Unnecessary Applications: Free up system resources by closing apps you don’t need.
- Check Storage Space: Ensure you have enough storage for recording high-quality videos.
| Issue | Solution |
|---|---|
| Audio Problems | Check microphone settings, update macOS, use third-party apps |
| Video Quality | Adjust screen resolution, close unnecessary apps, check storage space |
Credit: www.businessinsider.com
Sharing Your Recordings
After you screen record on a Macbook, sharing your recordings is the next step. Sharing your videos can help others learn or enjoy your content. Below, we’ll cover the essential steps to export your files and upload them to various platforms.
Exporting Files
First, you need to export your screen recordings. This process saves your recording as a file on your Macbook.
- Open your recording in the QuickTime Player.
- Click on File in the top menu.
- Select Export As and choose the desired resolution.
- Choose the location to save your file.
- Click Save.
Exporting in different resolutions helps you manage file sizes. For example, a 1080p resolution offers high quality but results in larger file sizes.
Uploading To Platforms
Once exported, you can upload your recordings to various platforms. Here are steps for some popular choices:
- YouTube
- Go to YouTube and log in.
- Click the Upload button at the top right.
- Drag and drop your video file, or select it from your Macbook.
- Fill in the details like title, description, and tags.
- Choose your privacy setting and click Publish.
- Google Drive
- Open Google Drive and log in.
- Click on the New button, then select File upload.
- Select your recording file from your Macbook.
- Wait for the upload to finish.
- Right-click the file to share it with others.
- Dropbox
- Open Dropbox and log in.
- Click on Upload files.
- Select your recording file and click Open.
- Wait for the file to upload.
- Share the file by clicking on Share and entering the recipient’s email.
Uploading to these platforms ensures your recordings are accessible from anywhere. It also makes it easy to share with friends, family, or colleagues.

Credit: www.youtube.com
Frequently Asked Questions
How Do You Screen Record On A Macbook?
To screen record on a Macbook, use the built-in QuickTime Player or macOS’s Screenshot toolbar.
Can You Record Audio While Screen Recording?
Yes, you can record audio while screen recording by selecting the appropriate microphone option in the recording settings.
Where Are Screen Recordings Saved?
Screen recordings are saved to your desktop by default, but you can choose a different location in the settings.
Is There A Time Limit For Screen Recording?
No, there is no time limit for screen recording on a Macbook. It depends on your storage capacity.
Can I Edit My Screen Recordings?
Yes, you can edit screen recordings using built-in QuickTime Player or third-party software like iMovie or Final Cut Pro.
Conclusion
Screen recording on a MacBook is simple and effective. Use built-in tools like QuickTime or third-party apps. Choose based on your needs. Both options offer great flexibility. Enhance your productivity and creativity with these tools. Start screen recording on your MacBook today.
Happy recording!