
Yes, you can share audio on a MacBook using built-in features like AirDrop or third-party apps. These options make audio sharing simple and efficient.
Sharing audio on a MacBook is straightforward and convenient. Apple’s ecosystem offers tools like AirDrop, which allows you to send audio files between Apple devices seamlessly. For those looking for more versatility, various third-party applications can help share audio across different platforms.
This functionality is particularly useful for students, professionals, and creatives who frequently collaborate and need to share sound files quickly. Whether you’re transferring a voice memo, music track, or podcast episode, MacBook’s audio-sharing capabilities ensure your files reach their destination without hassle.
Setting Up Audio Sharing
Sharing audio on a MacBook can be very useful. You can share music, podcasts, or any audio files with others. Here is a step-by-step guide to setting up audio sharing.
Required Tools
Before starting, make sure you have these tools:
- A MacBook running macOS Big Sur or later
- Bluetooth headphones or speakers
- Stable internet connection
Initial Settings
Follow these steps to prepare your MacBook for audio sharing:
- Open the System Preferences from the Apple menu.
- Select Sound from the options available.
- Click on the Output tab to see available audio devices.
- Ensure your Bluetooth device is paired and connected.
To pair a new Bluetooth device:
- Click the Bluetooth icon in the menu bar.
- Select Bluetooth Preferences.
- Click Pair next to your device name.
Once paired, your device will appear in the Output tab.
Now you can share audio using your preferred Bluetooth device. Enjoy seamless audio sharing with friends or family using your MacBook.
Credit: eshop.macsales.com
Using Built-in Features
Sharing audio on a MacBook is easy using built-in features. These features enhance your audio experience. Below, we explore how to use these built-in features effectively.
System Preferences
To start, open System Preferences on your MacBook. You can find it in the Apple menu. Click on the Apple logo at the top left corner. Then select “System Preferences” from the drop-down menu.
Once in System Preferences, locate and click on the “Sound” icon. This will open the sound settings where you can manage audio inputs and outputs.
Sound Output Options
Next, navigate to the Sound Output tab. Here, you can see all available audio output devices. This includes internal speakers, headphones, and Bluetooth devices.
Select the device you want to use for audio output. For instance, choose “Internal Speakers” for built-in speakers. Or, select “Bluetooth” if you are using wireless headphones.
Pro Tip: You can also adjust the balance and volume levels in this tab. This ensures the best audio experience for your needs.
Here’s a quick summary in table form:
| Step | Action |
|---|---|
| 1 | Open System Preferences |
| 2 | Click on the Sound icon |
| 3 | Select the Sound Output tab |
| 4 | Choose your desired audio output device |
Using these built-in features makes audio sharing easy and efficient. Enjoy a seamless audio experience on your MacBook!
Third-party Applications
Sharing audio on a MacBook can be challenging using built-in options. Thankfully, third-party applications offer robust solutions. These apps provide easy ways to share audio seamlessly. In this section, we will explore the top picks and guide you through the installation process.
Top Picks
Third-party applications make sharing audio on MacBook simple and effective. Here are our top picks:
| Application | Features |
|---|---|
| Rogue Amoeba Loopback | Create virtual audio devices. Combine multiple sources. Easy to use interface. |
| Audio Hijack | Record any audio. Apply effects. Advanced scheduling. |
| Soundflower | Free and open-source. Route audio between apps. Simple interface. |
Installation Guide
Follow these steps to install and configure your chosen app:
- Download the Application: Visit the official website of your chosen app. Download the installer file.
- Run the Installer: Open the downloaded file. Follow the on-screen instructions.
- Grant Permissions: Some apps need system permissions. Go to System Preferences > Security & Privacy > Privacy. Grant necessary permissions.
- Configure Audio Devices: Open the app. Set up virtual audio devices or routing as needed.
- Test the Setup: Play audio. Ensure everything works as expected.
Using third-party applications, sharing audio on a MacBook is no longer a hassle. Choose an app that fits your needs and follow the installation steps carefully.
Credit: www.macrumors.com
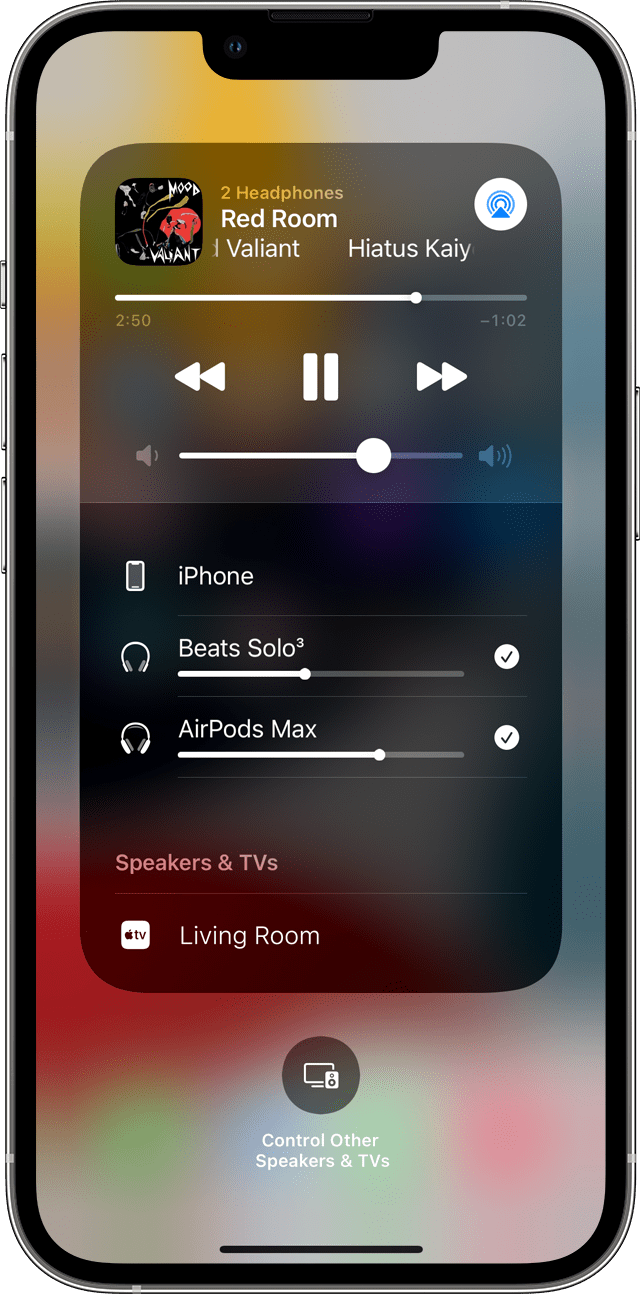
Bluetooth Audio Sharing
Bluetooth Audio Sharing on a MacBook is a fantastic feature. It allows you to share audio with multiple devices. This is perfect for group listening or sharing music with friends. Let’s dive into how you can make the most of this feature.
Pairing Devices
Before sharing audio, you need to pair your devices. Follow these steps:
- Open System Preferences on your MacBook.
- Select Bluetooth from the menu.
- Make sure your Bluetooth device is in pairing mode.
- Find your device in the list and click Connect.
- Repeat for any additional devices.
Troubleshooting Tips
If you face issues, try these troubleshooting tips:
- Ensure your devices are in pairing mode.
- Turn Bluetooth off and on again.
- Restart your MacBook and the Bluetooth device.
- Check for software updates on your MacBook.
- Remove the device and pair it again.
Bluetooth Audio Sharing on your MacBook is easy and fun. By following these steps, you can enjoy seamless audio sharing. Happy listening!
Sharing Via Airplay
Using AirPlay, you can easily share audio from your MacBook. AirPlay allows you to stream music and other audio to compatible devices. Follow these steps to start sharing your favorite sounds.
Enabling Airplay
First, ensure AirPlay is enabled on your MacBook.
- Open System Preferences.
- Click on Displays.
- In the AirPlay Display drop-down menu, select your desired device.
Make sure both devices are on the same Wi-Fi network. This is crucial for successful streaming.
Streaming Audio
Once AirPlay is enabled, follow these steps to stream audio:
- Open the Music app or any other audio app.
- Find the AirPlay icon, usually near the volume slider.
- Select the device you want to stream to.
The audio should now play on your selected device. Enjoy your music or podcast on a bigger sound system.
Here is a quick reference table:
| Step | Action |
|---|---|
| 1 | Open System Preferences |
| 2 | Select Displays |
| 3 | Choose AirPlay Device |
| 4 | Open Music App |
| 5 | Click AirPlay Icon |
| 6 | Select Streaming Device |
Advanced Audio Settings
Advanced audio settings can greatly enhance your audio sharing experience on a MacBook. These settings allow you to manage and customize your audio output and input efficiently. Let’s dive into two crucial aspects: Audio MIDI Setup and Custom Configurations.
Audio Midi Setup
The Audio MIDI Setup utility is a powerful tool. It helps you manage audio devices on your MacBook. This tool allows you to configure your audio inputs and outputs. You can find it in the Utilities folder inside the Applications folder.
Here’s how you can use it:
- Open Audio MIDI Setup from the Utilities folder.
- Select the audio device you want to configure from the list.
- Click the Configure Speakers button to set up your speakers.
- Use the Input and Output tabs to adjust settings.
This tool is beneficial for those using multiple audio devices. It allows you to switch between them seamlessly.
Custom Configurations
Custom configurations provide more control over your audio settings. You can create aggregate devices. These devices combine multiple inputs and outputs into one virtual device.
Follow these steps to create an aggregate device:
- Open Audio MIDI Setup.
- Click the Plus button at the bottom of the device list.
- Select Create Aggregate Device.
- Check the boxes for the devices you want to include.
- Configure the sample rate and other settings as needed.
Creating an aggregate device helps when you need multiple audio sources. It is ideal for professional audio work.
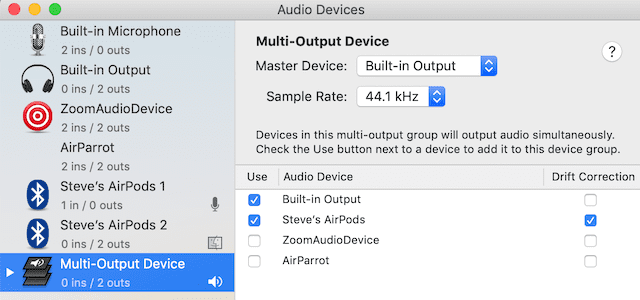
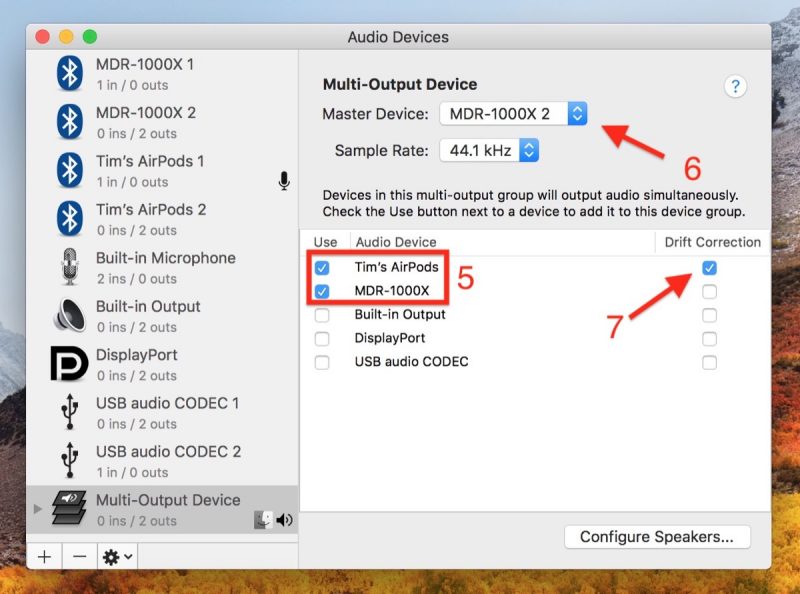
Additionally, you can set up a multi-output device:
- Click the Plus button in the Audio MIDI Setup.
- Select Create Multi-Output Device.
- Check the boxes for the outputs you want to include.
This setup is useful for sharing audio across different devices.
| Feature | Description |
|---|---|
| Audio MIDI Setup | Configures audio inputs and outputs. |
| Aggregate Device | Combines multiple audio sources. |
| Multi-Output Device | Shares audio across different devices. |
Credit: support.apple.com
Frequently Asked Questions
Can You Share Audio During A Facetime Call?
Yes, you can share audio during a FaceTime call by using SharePlay.
How To Share Audio Via Bluetooth On Macbook?
Enable Bluetooth on both devices, then connect them through the Bluetooth settings.
Can I Share System Audio On A Macbook?
Yes, you can share system audio by using third-party apps like Loopback or Soundflower.
What Apps Allow Audio Sharing On Macbook?
Apps like Zoom, Skype, and Google Meet allow audio sharing on a MacBook.
Is It Possible To Share Audio Files On Macbook?
Yes, you can share audio files using AirDrop, email, or cloud services like iCloud and Google Drive.
Conclusion
Sharing audio on your MacBook is easy and versatile. With built-in tools and third-party apps, you have options. Whether for work or leisure, you can seamlessly share sound. Follow the steps outlined to enhance your MacBook experience. Enjoy sharing your favorite audio effortlessly.
Happy sharing!