To install Windows on a new SSD, create a bootable USB drive with the Windows installation media. Then, connect the SSD, boot from the USB, and follow the installation prompts.
Installing Windows on a new SSD is a great way to enhance your computer’s performance. An SSD significantly speeds up boot times and application loading. This process might seem daunting, but it’s straightforward with the right steps. You’ll need a few tools, including a USB drive for the installation media and a compatible version of Windows.
Whether you’re upgrading your existing system or building a new one, installing Windows on an SSD can breathe new life into your computer. This guide will walk you through each step to ensure a successful installation.
Introduction To Ssd Installation
Installing Windows on a new SSD can enhance your computer’s speed. Solid State Drives (SSDs) offer many advantages over traditional hard drives. This guide will simplify the SSD installation process. Follow the steps to get your system running smoothly.
Benefits Of Using An Ssd
Switching to an SSD brings many advantages:
- Faster Boot Times: SSDs load Windows in seconds.
- Improved Performance: Applications open quickly and run smoothly.
- Durability: SSDs are more resistant to physical damage.
- Less Noise: No moving parts mean quieter operation.
- Lower Power Consumption: SSDs use less energy, saving battery life.
Prerequisites For Installation
Before starting, gather the necessary items:
- New SSD: Ensure it is compatible with your system.
- Windows Installation Media: USB drive or DVD.
- Screwdriver: To secure the SSD in the computer.
- Backup Storage: Save important files from your old drive.
- Computer Manual: Check for specific installation steps.
Ensure your computer is powered off before proceeding. Read the manual for proper SSD installation guidelines.
Choosing The Right Ssd
Choosing the right SSD is crucial for your PC. The right SSD enhances speed and performance. Let’s break down the key factors to consider.
Ssd Types And Interfaces
Different SSD types and interfaces affect performance. Here are the main types:
- SATA SSDs: Standard interface, slower speeds.
- M.2 SSDs: Compact, faster, and more efficient.
- NVMe SSDs: Best performance, ideal for gaming and heavy tasks.
Here’s a simple table comparing them:
| Type | Speed | Form Factor |
|---|---|---|
| SATA SSD | 500-600 MB/s | 2.5 inches |
| M.2 SSD | 1000-3500 MB/s | M.2 2280 |
| NVMe SSD | 2000-7000 MB/s | M.2 2280 |
Capacity And Performance Considerations
Capacity matters for storage needs. Choose based on your usage:
- Basic Use: 250GB to 500GB.
- Gaming: 1TB or more.
- Professional Work: 2TB or higher.
Performance is key too. Look for:
- Read Speeds: Higher is better.
- Write Speeds: Important for file transfers.
- Endurance: Measured in TBW (Terabytes Written).
Consider both capacity and performance for the best experience. Choose wisely to enjoy a faster PC.
Preparing For Windows Installation
Preparing for Windows installation on a new SSD is crucial. Proper steps ensure a smooth setup. Follow these guidelines to get ready.
Creating A Windows Installation Media
To install Windows, you need installation media. This can be a USB flash drive or DVD. Here’s how to create it:
- Visit the Microsoft website.
- Download the Windows Media Creation Tool.
- Run the tool on your computer.
- Select Create installation media for another PC.
- Choose the language, edition, and architecture.
- Choose USB flash drive or ISO file.
- Follow the prompts to complete the process.
For a USB flash drive, ensure it has at least 8 GB of space. Back up any important files as this process will erase the drive.
Backing Up Important Data
Before installation, back up your data. This protects your files from loss. Follow these steps:
- Identify important files and folders.
- Choose a backup method:
- External hard drive
- Cloud storage
- Copy files to your chosen backup location.
- Verify that files are safely backed up.
Backing up ensures you won’t lose any valuable information. Take this step seriously for a smooth transition.
Installing The Ssd In Your Pc
Installing a new SSD can boost your PC’s speed. Follow these simple steps for a smooth installation.
Safety Precautions
- Turn off your PC and unplug it.
- Wear an anti-static wrist strap to prevent static damage.
- Work in a clean, dry area.
- Handle the SSD by its edges only.
Step-by-step Installation Process
-
Open Your PC Case:
Use a screwdriver to remove the case screws. Keep screws safe.
-
Locate the SSD Slot:
Find the M.2 slot or 2.5-inch bay. Check your motherboard manual.
-
Insert the SSD:
For M.2 SSDs, align it with the slot. Push down gently. For 2.5-inch SSDs, place it in the bay.
-
Secure the SSD:
Use screws to fix the SSD in place. Ensure it’s tight but not overly tight.
-
Reconnect Cables:
For 2.5-inch SSDs, connect the SATA cable. Plug in the power cable.
-
Close the Case:
Carefully put the case cover back on. Tighten the screws.
-
Power On Your PC:
Plug in your PC and turn it on. Check for SSD detection in BIOS.
Follow these steps to install your SSD safely. Enjoy faster load times and improved performance!
Bios Configuration For Ssd
Configuring the BIOS is crucial for installing Windows on your new SSD. Proper settings ensure the SSD operates at peak performance. This section guides you through accessing BIOS and setting it up correctly.
Accessing Bios/uefi Settings
To access the BIOS or UEFI settings, follow these steps:
- Restart your computer.
- Press the designated key during startup. Common keys include:
| Manufacturer | Key |
|---|---|
| HP | Esc or F10 |
| Dell | F2 |
| Lenovo | F1 or F2 |
| ASUS | Del or F2 |
| Acer | F2 or Del |
Keep pressing the key until the BIOS screen appears. Use the arrow keys to navigate.
Boot Order And Ahci Mode Setup
Setting the boot order and AHCI mode is essential for optimal SSD performance. Follow these steps:
- Navigate to the “Boot” menu in BIOS.
- Locate “Boot Order” settings.
- Set your SSD as the first boot device.
Next, enable AHCI mode:
- Find the “SATA Configuration” section.
- Select “AHCI” from the options.
Both actions improve system speed and efficiency. Save your changes before exiting the BIOS. Restart the computer to proceed with the Windows installation.

Credit: m.youtube.com
Installing Windows On The New Ssd
Installing Windows on a new SSD can boost your system’s speed. It makes your computer faster and more efficient. Follow these steps to set up Windows properly.
Booting From Installation Media
To start the installation, you need to boot from your installation media. This can be a USB drive or a DVD. Here’s how to do it:
- Plug in the USB drive or insert the DVD.
- Restart your computer.
- Enter the BIOS or UEFI settings. This usually requires pressing a key like F2 or Delete during startup.
- Find the boot menu settings.
- Select your installation media as the first boot device.
- Save changes and exit the BIOS/UEFI.
Your computer should now boot from the installation media. You will see the Windows Setup screen shortly.
Windows Setup And Partitioning
After booting from the installation media, follow these steps:
- Select your language, time, and keyboard preferences.
- Click Next and then Install Now.
Next, you will need to choose the installation type:
| Installation Type | Description |
|---|---|
| Upgrade | Keep files and settings from the old installation. |
| Custom | Install Windows fresh and create new partitions. |
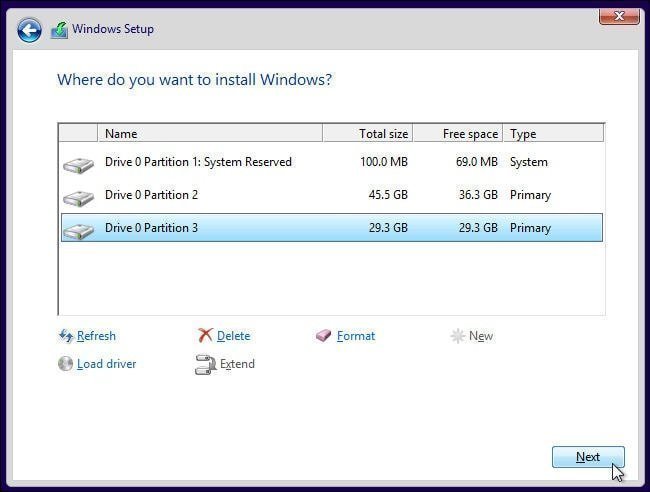
Select Custom for a fresh start. You will see your SSD listed here. If the SSD is empty, it may show as unallocated space.
To create a partition:
- Select the unallocated space.
- Click New.
- Choose the size for the partition and click Apply.
Windows will create additional partitions needed for system files. Select the primary partition and click Next. Windows will start copying files and installing the OS.
Follow the on-screen prompts to complete the installation. Set up your preferences and create a user account. Your new SSD is now ready with Windows installed!
Post-installation Setup
After installing Windows on your new SSD, the next step is crucial. Proper setup enhances performance and ensures a smooth user experience. This phase includes installing drivers, applying updates, and optimizing settings.
Installing Drivers And Updates
Drivers are essential for your hardware to function correctly. Follow these steps to install the necessary drivers:
- Connect to the internet.
- Open Device Manager.
- Locate devices with yellow warning signs.
- Right-click each device and select Update Driver.
After updating drivers, check for Windows updates:
- Open Settings.
- Select Update & Security.
- Click Check for updates.
Install all available updates. Restart your PC to apply changes.
Optimizing Ssd Performance
Optimizing your SSD enhances speed and longevity. Here are some tips:
| Action | Description |
|---|---|
| Enable TRIM | Helps the SSD manage unused data efficiently. |
| Disable Disk Defragmentation | SSDs do not need defragmentation. |
| Turn Off Hibernation | Free up space on your SSD. |
| Adjust Power Settings | Set to High Performance. |
Follow these steps to enable TRIM:
fsutil behavior set DisableDeleteNotify 0Run this command in Command Prompt as an administrator. After making these adjustments, your SSD will perform better and last longer.

Credit: www.easeus.com

Credit: www.ubackup.com
Frequently Asked Questions
How Do I Prepare My Ssd For Windows Installation?
Format your SSD using Disk Management before installation. Ensure it’s unallocated to allow Windows to create necessary partitions.
Can I Install Windows On An External Ssd?
Yes, Windows can be installed on an external SSD. Ensure your computer supports booting from USB devices.
What Tools Do I Need For Installation?
A Windows installation USB or DVD, a compatible SSD, and a screwdriver for physical installation are necessary.
Is It Necessary To Format The Ssd?
Yes, formatting the SSD clears old data and prepares it for a fresh Windows installation, ensuring optimal performance.
How Long Does The Installation Take?
The installation usually takes 20 to 45 minutes, depending on your system’s speed and the version of Windows. “`
Conclusion
Installing Windows on a new SSD can significantly enhance your computer’s performance. Following these steps ensures a smooth installation process. Once complete, you’ll enjoy faster boot times and improved overall system responsiveness. Embrace the upgrade and experience the benefits of a fresh and speedy Windows environment on your new SSD.
