
To partition an SSD, use disk management tools available in your operating system. Create a new partition by selecting unallocated space and formatting it.
Partitioning an SSD can enhance performance and organization, making it easier to manage data. Whether you’re setting up a new drive or reorganizing an existing one, proper partitioning allows for efficient storage allocation. Users often partition SSDs to separate operating systems, applications, and personal files, optimizing speed and access times.
Understanding the steps involved in partitioning can help you maximize your SSD’s capabilities. This guide will walk you through the process, ensuring you allocate your storage effectively. With the right approach, you can enjoy a well-structured and high-performing SSD.
Introduction To Ssd Partitioning
Partitioning an SSD (Solid State Drive) helps organize data efficiently. It creates separate sections for different types of files. This process enhances performance and improves data management. Understanding how to partition SSDs is crucial for optimal system performance.
Benefits Of Partitioning
Partitioning an SSD offers numerous advantages:
- Improved Organization: Keep files neatly arranged.
- Enhanced Performance: Faster access to important data.
- Data Security: Isolate sensitive information.
- Easy Backups: Simplifies data recovery processes.
- Better Management: Allocate space for specific applications.
Ssd Vs Hdd: Partitioning Differences
Partitioning SSDs differs from partitioning HDDs (Hard Disk Drives). Here are some key differences:
| Feature | SSD | HDD |
|---|---|---|
| Speed | Very fast data access | Slower data access |
| Fragmentation | No fragmentation issues | Can suffer from fragmentation |
| Durability | More durable, no moving parts | Less durable, has moving parts |
| Power Consumption | Lower power usage | Higher power usage |
Understanding these differences helps in choosing the right partitioning strategy. SSDs require less management than HDDs. This makes them ideal for quick data access.
Pre-partitioning Considerations
Before partitioning your SSD, consider several important factors. These will help ensure a smooth process. Proper planning avoids potential issues later.
Data Backup Essentials
Backing up data is crucial before partitioning your SSD. A backup protects your files from loss. Follow these steps:
- Choose a reliable backup tool.
- Identify important files and folders.
- Copy data to an external drive or cloud storage.
Verify that your backup is complete. Test the backup by accessing some files. This step guarantees that your data is safe.
Choosing Partition Sizes
Selecting the right partition sizes is vital. It affects performance and storage efficiency. Consider these factors:
- Operating System requirements
- Software installation needs
- File storage habits
Here’s a simple table to guide you:
| Partition Type | Recommended Size |
|---|---|
| OS Partition | 100 GB |
| Applications | 50 GB |
| Data Storage | Variable (based on needs) |
Adjust sizes based on your usage. Keeping some space free is wise. This improves SSD longevity and performance.
Tools You’ll Need
Partitioning an SSD requires the right tools. These tools make the process easier and safer. They help you create, delete, or resize partitions without data loss.
Built-in Os Tools
Most operating systems provide built-in tools for partitioning SSDs. These tools are user-friendly and require no additional downloads. Here are the main options:
- Windows Disk Management
- macOS Disk Utility
- Linux GParted
Each tool has different features:
| OS | Tool | Features |
|---|---|---|
| Windows | Disk Management | Create, delete, and format partitions |
| macOS | Disk Utility | Erase, partition, and restore disks |
| Linux | GParted | Resize, move, and format partitions |
Third-party Software Options
Third-party software offers more advanced features. These tools can help with complex tasks. Some popular options include:
- AOMEI Partition Assistant
- MiniTool Partition Wizard
- EaseUS Partition Master
These tools provide benefits like:
- Easy-to-use interfaces
- Advanced partition management features
- Data recovery options
Choose the tool that best fits your needs. Each option has unique strengths.
Credit: m.youtube.com
Step-by-step Partitioning Guide
Partitioning an SSD helps manage data efficiently. This guide provides clear steps to create, format, and manage partitions.
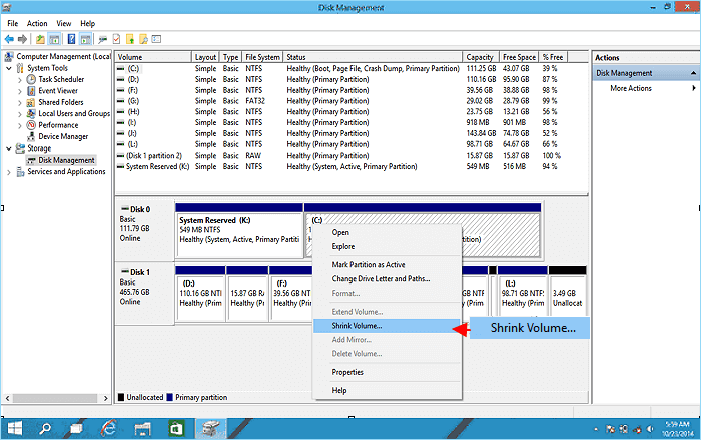
Accessing Disk Management
Follow these steps to access Disk Management:
- Press Windows + R keys together.
- Type diskmgmt.msc and hit Enter.
- Disk Management window opens.
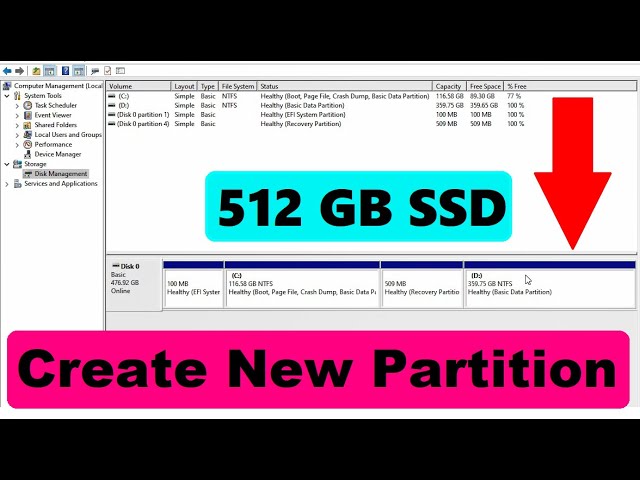
Here, you will see all your disks. Identify the SSD you want to partition.
Creating Partitions
Creating partitions is simple. Follow these steps:
- Right-click on the SSD.
- Select Shrink Volume.
- Enter the size for the new partition.
- Click Shrink.
- Right-click on the unallocated space.
- Choose New Simple Volume.
- Follow the wizard to create the partition.
This process creates a new partition. You can repeat it for more partitions.
Formatting New Partitions
Formatting partitions is crucial for data storage. Here’s how:
- Right-click on the new partition.
- Select Format.
- Choose a file system: NTFS or FAT32.
- Check Perform a quick format.
- Click OK to start formatting.
Formatting prepares the partition for use. All data will be erased.
Troubleshooting Common Issues
Partitioning your SSD can lead to some unexpected problems. Knowing how to troubleshoot these issues is essential. Here are some common problems and how to solve them.
Handling Errors
Errors can occur during SSD partitioning. Here are some common errors and their solutions:
| Error Message | Possible Cause | Solution |
|---|---|---|
| Disk is Write-Protected | Physical write protection enabled | Disable write protection switch |
| Partition Failed | Insufficient Disk Space | Free up space or shrink existing partitions |
| Disk Unrecognized | Faulty Connection | Check cables and restart your computer |
Follow these steps to handle errors effectively:
- Identify the error message.
- Refer to the table above for causes and solutions.
- Apply the appropriate solution.
Recovering Lost Data
Sometimes, partitioning can lead to data loss. Here’s how to recover your data:
- Stop using the SSD immediately.
- Use data recovery software.
- Follow the software instructions to scan your SSD.
- Save recovered files to another storage device.
Some popular data recovery tools include:
- Recuva
- EaseUS Data Recovery Wizard
- Disk Drill
Always backup your data before partitioning. This prevents loss and saves time.
Credit: www.easeus.com
Optimizing Ssd Performance Post-partition
After partitioning your SSD, optimizing its performance is crucial. Proper maintenance helps ensure longevity and speed. Two key aspects are alignment and TRIM. These factors greatly impact how efficiently your SSD operates.
Alignment And Trim
SSD alignment is vital for performance. Proper alignment reduces write amplification. This means faster speeds and less wear on the drive.
- Align partitions to 4KB boundaries.
- Use disk management tools for alignment checks.
- Check alignment after partitioning.
The TRIM command helps manage unused data. It tells the SSD which blocks are no longer in use. This improves write performance over time. Make sure TRIM is enabled.
fsutil behavior query DisableDeleteNotifyRun this command in Command Prompt. A result of “0” means TRIM is active.
Maintaining Ssd Health
Regular maintenance boosts SSD health. Monitor your SSD’s health status frequently. Use tools like CrystalDiskInfo or Samsung Magician. These tools provide vital information.
| Maintenance Task | Frequency |
|---|---|
| Check health status | Monthly |
| Update firmware | As needed |
| Run optimization tools | Quarterly |
Avoid defragmentation on SSDs. It can cause unnecessary wear. Instead, use optimization features provided by the operating system.
Advanced Partitioning Techniques
Understanding advanced partitioning techniques can enhance SSD performance. These methods allow for better data management. This section covers two key topics: Dynamic vs. Basic Disks and Using Command-Line Tools.
Dynamic Vs. Basic Disks
Choosing between dynamic and basic disks is crucial. Here’s a simple breakdown:
| Feature | Basic Disks | Dynamic Disks |
|---|---|---|
| Types of Partitions | Primary and Extended | Simple, Spanned, Mirrored, Striped |
| Volume Management | Limited | Flexible |
| Data Recovery | Basic recovery options | More advanced recovery options |
| Operating System Support | Widely supported | Requires specific OS versions |
Basic disks are simpler to manage. They are suitable for most users. Dynamic disks offer advanced features. Use them for complex storage needs.
Using Command-line Tools
Command-line tools provide powerful options for partitioning SSDs. They allow precise control over disk management. Here are some common commands:
- diskpart – Opens the disk partitioning tool.
- list disk – Displays all connected disks.
- select disk n – Selects the specific disk for partitioning.
- create partition primary size=size_in_MB – Creates a new primary partition.
- format fs=ntfs quick – Formats the partition quickly.
Here’s a simple step-by-step guide:
- Open Command Prompt as Administrator.
- Type diskpart and press Enter.
- Use list disk to view disks.
- Select your SSD using select disk n.
- Create a partition using create partition primary size=5000 for 5GB.
- Format the partition using format fs=ntfs quick.
Command-line tools offer flexibility. They enable complex partitioning strategies. This method is ideal for advanced users.

Credit: superuser.com
Frequently Asked Questions
How Do I Partition An Ssd?
Partitioning an SSD involves using disk management tools to create separate sections for organizing data efficiently.
What Tools Can I Use To Partition Ssds?
You can use built-in tools like Disk Management on Windows or third-party software like MiniTool Partition Wizard.
Can I Partition An Ssd Without Losing Data?
Yes, partitioning an SSD can be done without data loss if you use reliable partitioning software and follow the instructions carefully.
What Is The Best Partition Size For Ssds?
A recommended partition size for SSDs is between 100GB to 500GB, depending on your storage needs and usage.
Is It Necessary To Partition An Ssd?
Partitioning is not necessary, but it helps in organizing data and can improve performance in certain scenarios.
Conclusion
Partitioning your SSD can significantly enhance its performance and organization. By creating separate sections, you can manage files more efficiently. This process not only optimizes storage but also improves data access speeds. Follow the steps outlined in this guide to ensure a smooth partitioning experience.
Happy computing!